


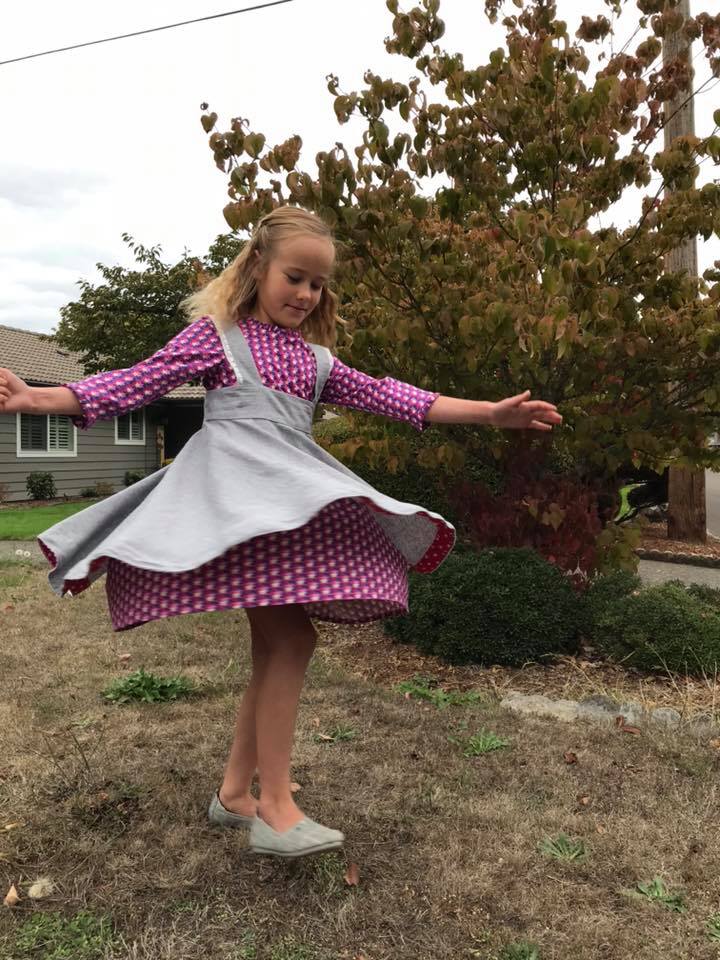
Through pure magic, I finished Camden's school photo outfit - score one point for me! I mean, there were failures, pin pricks and a 1:30 a.m. bedtime involved, but suffer pain and sleep loss for beauty, right??
No joke.


I am pretty much in LOVE with the final look of this Georgia and Lulu combination by Violette Field Threads. I am so glad someone in the group mentioned she had combined these two dresses. As soon as I checked the pattern pages on the VFT web-site, I knew it was a go for me, too! I then realized last week this would have to be her outfit for picture day, as I had clearly put NO thought into it.... then it was rush, rush, rush!


For the fabrics, I used Robert Kaufman Essex metallic from Modern Domestic, and you likely can't see the metallic in the photos, but it's SUCH a nice compliment to the dress! As for the main dress fabric, Camden chose it on the discount table at Bolt - score!!!


Now, I did something I so rarely do - in fact, when WAS the last time I sewed up a pdf pattern??? Too many cute patterns have gotten to me lately, and as VFT only sells pdf patterns, I had to suck it up - along with a few other designers in my sewing future. Anyway, putting VFT patterns together is a piece of cake!! I like how the pieces are matched up; that sort of detail is a BIG deal. I did learn I need to go through Adobe to print my patterns at the right size, as I wasn't getting my one inch by one inch box.


Starting with Georgia, the pattern itself is relatively simple - sleeves, bodice main and lining and skirt pieces - along with three other ruffles. If you are not into making small ruffles and inserting them at necklines and small circumference sleeves, then this isn't the pattern for you. Someone in the VFT Pattern Group mentioned having issues with the sleeve ruffles flipping out, but that doesn't appear to really be a problem with my version, and as for the neckline, I understitched the ruffle seam to the lining, just to keep things nice and neat. Installing the placket was easy enough, but I still don't know if the placket is 100% needed. We'll just pretend that it is, aha - in terms of getting the dress over the body, I mean.

As for the construction of the bodice and skirt, I sewed the sleeves onto the main dress fabric then hand-stitched the lining to the seam - and I did the same with the skirt/bodice attachment... as I did HERE. I was definitely feeling the pain last night, as I stayed up way too late and kept stabbing myself with pins, but I just felt this pattern, too, was lacking in nicer finishing touches. I just don't feel a dress should have a serged (or otherwise exposed) seem, when it could be completely covered up. It just feels so much more polished and is worth the time. And the only top-stitching, other than the hem, that I did on the dress was on the sleeves, to hold the ruffled seam in place nicely. Overall, it's a super fun dress, and I may have lengthened it for a bit more wear.

Moving on to the Lulu, I just think it is a great pinafore. I am happy with the basic construction and the fit. I did a few things differently on this, too - to make my life easier and to give it a better end result, though sadly, a couple things didn't work out because I am a fool, LOL. The shoulder straps are to be sewn on the tab side and then folded under and top-stitched on the opposite side, but I sewed it as a tube then turned it out. I assume it is NOT done this way because the tabs are a bit annoying to pull through - but NOT impossible. And I didn't want too much top-stitching on this, either. I did insert lace on the shoulders, but I didn't think about inserting it on both sides.... and I completely forgot to insert it under the waistband, which I had meant to do.
I waistband/skirt seam would have also been left exposed, as with the Georgia, and I didn't want this look, so, I had to think about that when installing the zipper. In this case, I sewed the zipper on to the main fabric first, then I hand-stitched at the zipper and all around the lining of the waistband all around. This meant starting my back skirt seam a couple inches down (they called for three inches, but I did no more than 2.5 inches), then serging that before applying the zipper. In my haste to be cool and have a fancy pinafore, I chopped off the top of the zipper, including the zipper stop - WHYWHYWHY????! Ugh. I clearly could have installed a new zipper, but I didn't have the right color, so, I hand-stitched four thousand stitches at the top, making my OWN zipper stop, aha. Not super classy, which is a bummer, but it works.
 |
| OMG. WAY ignore the zipper I haven't yet finished!!! LOL |

 |
| Ah! That puckering! |


And some days in the life of!!


 |
| Piggy magoo is a grape thief! |


 |
| Building my sewing room book shelf |


